If you have previously photographed outdoor scenes, you have probably come across images that have an uneven sky. It can happen when photographing landscapes with wide-angle lenses, and it can be particularly visible when using a polarizing filter. The latter cases can be quite difficult to deal with in post-processing, often resulting in failed attempts to save those images. Thankfully, there are some great post-processing tools available that can help. Today, we will take a look at how you can use Lightroom and Nik Software’s Viveza (now part of DxO) to quickly fix uneven skies in your images.
We will go through two case scenarios – one that has a relatively easy sky to fix, and one that is very difficult to fix due to the use of a polarizer. For the first case scenario, I will use Lightroom’s built-in Graduated Filter tool to take care of the problem. For the second case scenario, I will use Nik Software Viveza as a plugin to Photoshop (but you can launch the tool via Lightroom as a plugin, or you can also run it directly without any other software).
Please note that while Nik Software can still be downloaded and used for free (you can find the previous free distribution by Google on the Internet), DxO bought the software from Google and now actively maintains it. If you would like to get the latest version of Nik Collection that is fully compatible with all Lightroom and Photoshop versions, you can get it from DxO.
Fixing Uneven Sky with Lightroom
The first step in fixing an uneven sky is to check and see if it can be easily fixed in Lightroom by using the Graduated Filter. Whenever the sky has a gradual transition that makes only one part of it look darker than the other one, you should be able to easily take care of the problem without resorting to any other software. Let’s take a look at the first photograph and figure out what needs to be done:

As you can see, the left side of the image appears noticeably darker when compared to the right side. Sometimes this can happen when using a polarizing filter, or sometimes the sky is simply brighter on one side due to its proximity to the sun. Fixing such issues is quite easy with the help of the Graduated Filter in Lightroom. All you have to do, is pick the tool, then slide it from one corner until the end of the transition line, then increase the exposure, as shown below:

As you can see, dialing +0.7 exposure took care of the problem in the sky. However, it did introduce an issue – using the graduated filter also impacted the brightness of the left side of the building, which is not good. To make sure that only the sky gets touched with this exposure adjustment, we can use the Brush tool and erase the parts of the mask that are applied to the building. To do this, press the “O” button on your keyboard (which reveals the mask), then navigate to “Tools -> Adjustment Mask Overlay” and set the mask color to something that stands out from the sky and the objects you want to exclude. In my case, I set it to Red.
From there, click on “Brush” to the right of “Mask” in the Graduated Filter panel, click “Erase” and make sure to select “Auto Mask”, so that your brush strokes do not end up touching the sky. Erase everything that needs to be excluded and change the brush size as needed. For those areas that are not close to the sky, unchecking “Auto Mask” and brushing out the areas will be much faster. Here is the final mask of my image in Lightroom, which shows that I was able to completely eliminate the structure:

And here is the final image, which shows a fairly even sky:

X-H1 + XF 10-24mm f/4 R OIS @ 10mm, ISO 200, 1/210, f/8.0
Fixing Uneven Sky with Viveza
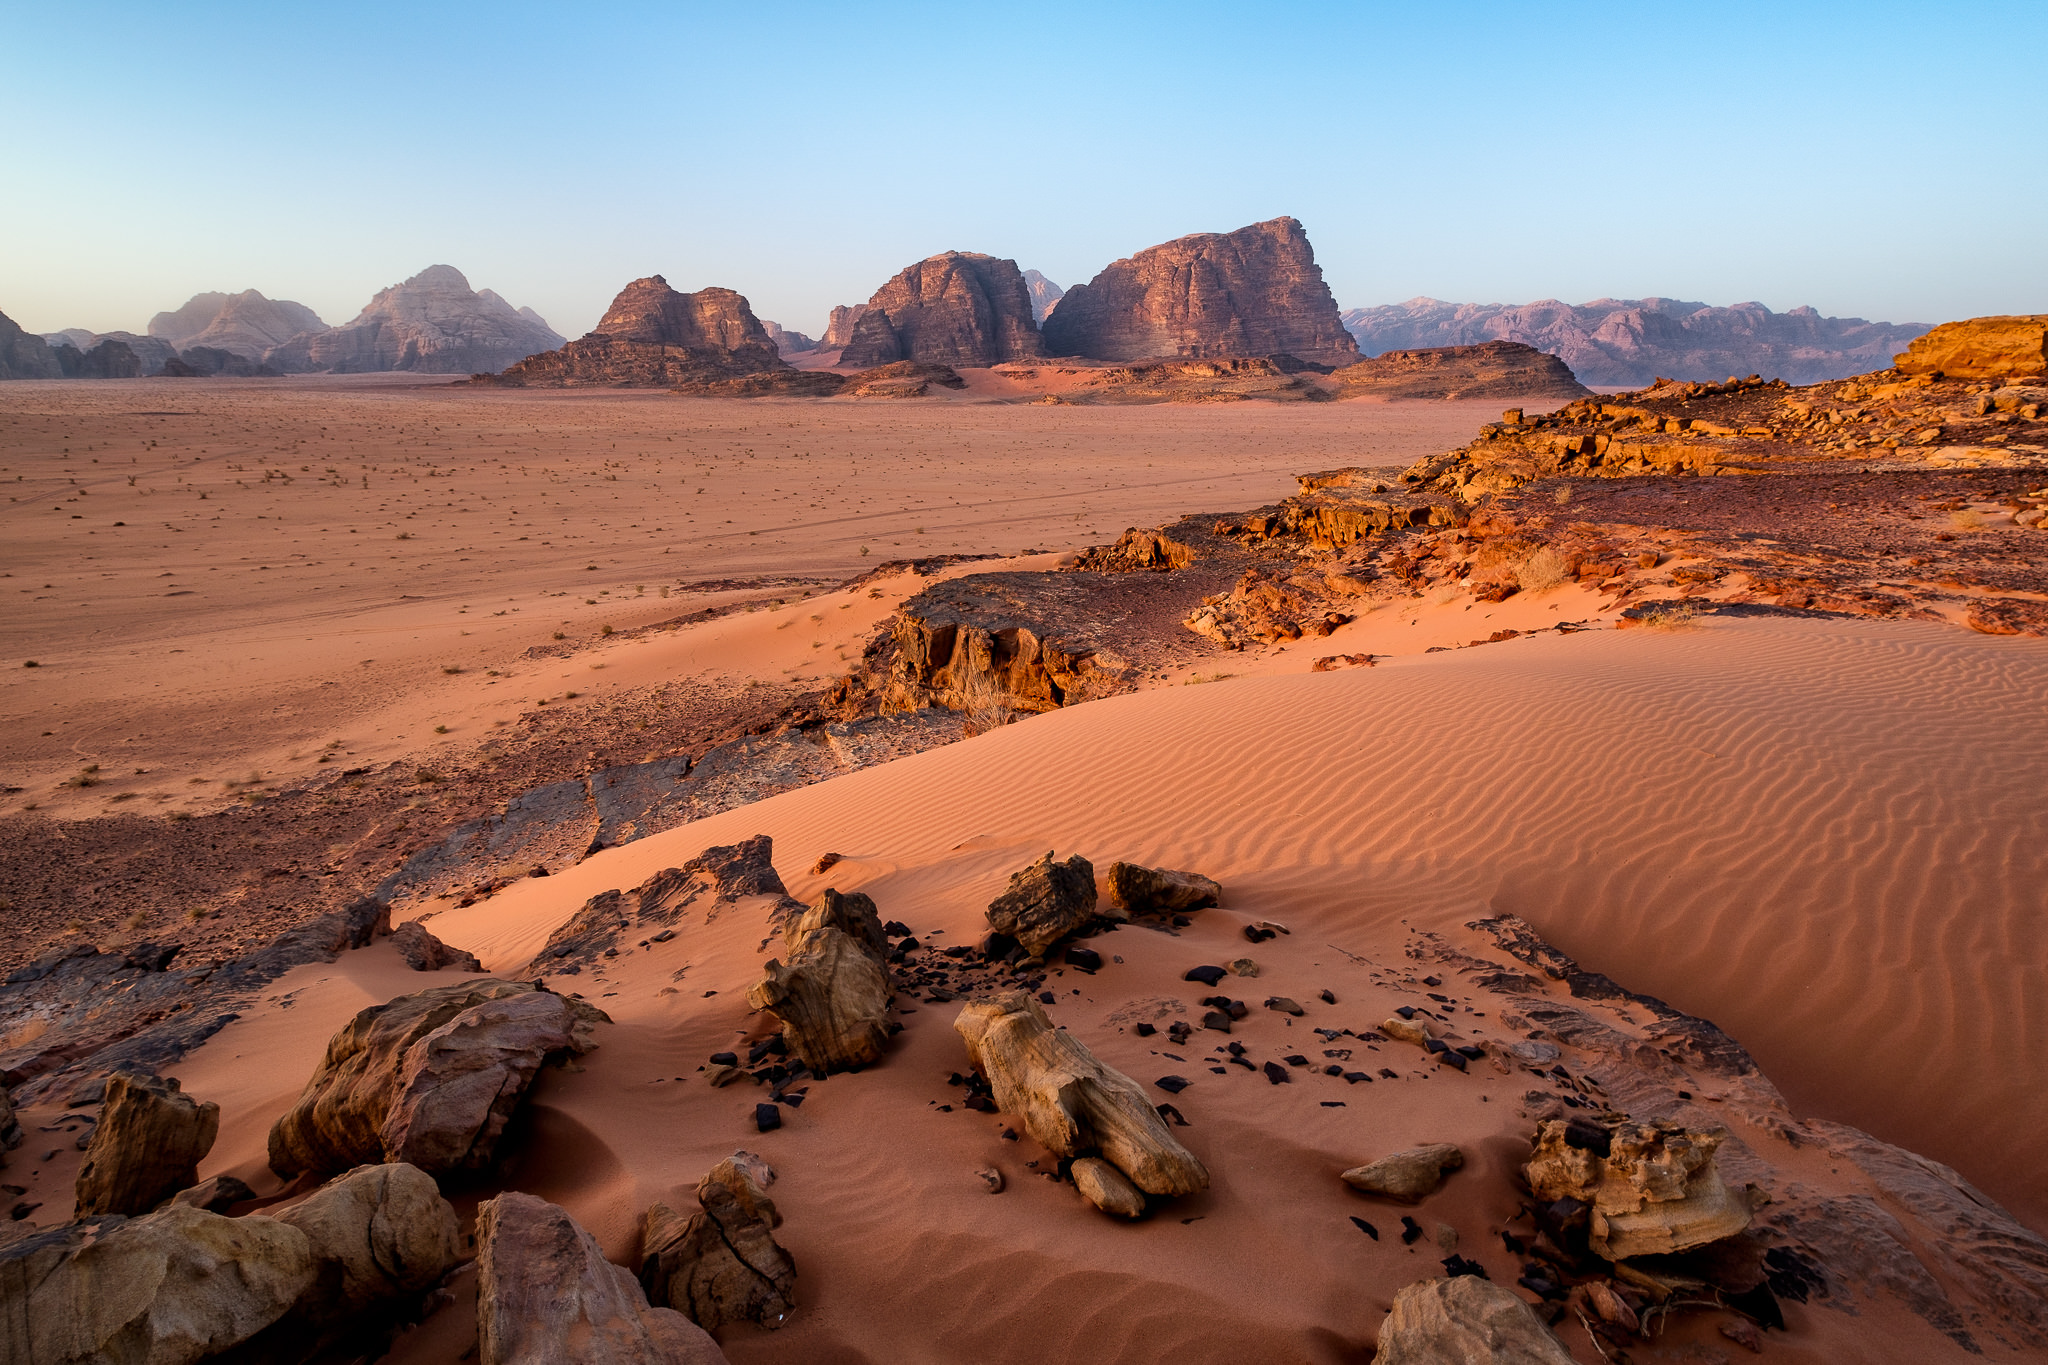
What if you are working on a much more complicated image, where the sky does not have a gradual transition, or worst yet, if the use of a circular polarizer made parts of the sky look very dark while the other parts are bright? In such situations, I find it incredibly difficult to fix the sky using Lightroom’s built-in tools. That’s where Photoshop or third party tools come to the rescue. Let’s take a look at the second case scenario:

In this particular situation, I intentionally used a polarizing filter to reduce the haze of the distant mountains. It worked out for the mountains, but as you can see, the filter messed up the sky by darkening the middle part of it. In addition, it changed the color of the sky, which is not good! Trying to fix these problems with Photoshop’s built-in tools would take a lot of effort and it would be impossible to fix in Lightroom. For such situations, Nik Software’s Viveza can come in really handy, which is what I will use to try to fix the sky.
The great thing about Nik Software is the U Point Technology, which allows one to add a control point to a part of the image, size it, then adjust settings like Brightness, Contrast, Saturation, Structure, as well as specific color adjustments, all without affecting other parts and colors of the image. For this image, my goal was to make the sky look as even as possible, which involves brightening up the middle of the sky, as well as potentially changing its color. Here is how Viveza looks with a control point already added to the middle of the sky and some settings already applied:

I had to dial +40% Brightness to make the sky look more or less even, but the middle part still had a very different shade of blue. To reduce color differences, I also added -15 Hue, which made the sky in the middle of the frame look more or less even. Take a look at the result of this quick effort:

The image is already looking a lot better, but we still have the color problem – the sky has a different shade of blue on the left compared to the right. In such situations, instead of adding another control point to the same image, I find it best to click “OK”, then relaunch the tool and address the next specific problem. Using multiple control points in such cases might make the results look worse due to the way control points overlap, so you might need to apply settings and relaunch Viveza several times.
After relaunching Viveza, I added another control point to the left side of the image, then dialed -5% for Brightness to slightly reduce the brightness of the left side and -20 for Warmth to make the left side look a bit cooler. This helped a lot, but the color was still a bit off, so I added +10% of Blue to make it look much more even:

Note how much bigger the control point is this time – I tried to select as much of the area that had different color as possible. Here is how the image looks with the second pass:

That’s looking a whole lot better, doesn’t it? It is not perfect still and there are slight color differences on the left and right side of the image, but I am fine with the way it already looks. If I wanted to, I could run another pass and make it look better…
Here is how the final image looks after the above adjustments, as well as additional Nik filters applied to the image (Color Efex to add some contrast and Viveza to reduce haze in the distant mountains):
X-T3 + XF 10-24mm f/4 R OIS @ 12mm, ISO 160, 1/25, f/8.0
Not bad – and all this took me just a few minutes to do!
Hope you found this article useful. Please let me know if you have any questions!
A BIG THANK YOU! This was exactly the advice I need to fix the uneven sky in my panorama stitching
Thanks for the tip on using Viveza. it will save some of my images from Arches NP when I forgot to take my polarizer filter off at sunrise.
Great tips. Thank you very much.
In Capture One Pro 12, there is a color editing tool designed to even out skin tones. This tool could even out a sky in about 10 to 20 seconds. I have just moved to Capture One from Lightroom and I’m not looking back.
In LR, you did not mention using the color range mask to select just the blue. That instead of erasing out the building.
David, please see my comment 1.3.1.1 above for details on the Range Mask feature.
Great tutorial, thank you.
I wonder whether the picture quality will deteriorate with opening it in Viveza (or any other tool for that matter) multiple times? I try to avoid opening a photo in Photoshop (while in Lightroom) fearing it would loose something, am I wrong?
Rashad, when opening images in Photoshop, if you have used either Camera RAW or Lightroom, they automatically become 16-bit TIFF files – you can reopen them as many times as you want. The same goes for opening Viveza as a plugin, since the file gets converted to TIFF beforehand. Now when you already have a file open in Photoshop, you can reopen Viveza as many times as you would like and it will not deteriorate your images. It is only when you work on a JPEG file that you have to worry about opening and reopening an image.
It is important to note that when opening images in Photoshop via Lightroom, they are always saved as TIFF and will be created as separate files in Lightroom when saved in Photoshop. So you are still losing nothing, but you do end up with a larger TIFF file.
Thanks Nasim, that’s great to know
Thanks for this very short and easy to use tutorial.
One questions I have is, why would you relaunch Viveza every time you ad a control point rather then doing it at the same time?
Regards
John, you don’t need to relaunch Viveza every time a control point is added – you can add as many control points as you want. However, the trouble with multiple control points when working on a single area like the sky, is that it will be very hard to set up correct transition points – one control point might impact the other one in a negative way, potentially making the image look much worse. For this reason, when correcting the sky specifically, I tend to apply one control point at a time to fix troubled areas. Once everything is even, you can add as many control points as you want.
Hope this makes sense.
Hi Nasim. Is this the same problem as in the old CNX2, where if you were using multiple control points, you had to select ‘New Step’ to make sure your new control point did not interact with the previous points?
Fingers crossed the DXO keeps going – just bought Photolab (and the Nik plugins) to handle my D850 files, alongside CNX2 for the D800 – trying to avoid PS and LR!
Nasim, thanks a lot for these fine demonstrations. I check your site at least every other day! As for the NIK-Software update from Dxo there is a caveat. When you download their trial version (which I did), installing it will rob you of a previous version you possibly have on your machine. The effect is, that you can’t start your former NIK package – when you own one – any more without beeing remembered that you have to purchase the DxO Update. This is not fair. Indeed I feel a bit cheated as I paid several hundred bucks some years ago for the original NIK product. On their website there is a link to the giveaway download from google – alas it doesn’t work. Also, consider that DxO is in a bankruptcy process. They need money and therefore they are also offering updates for their other software. Check carefully if these updates are worth their money. The changes I could find are very minor.
Please excuse my fervour, but perhaps I can prevent fellow enthusiasts to loose their investment.
Greetings from Old Europe, fm
PS the old NIK tools, which are tremendously effective and fun to use did work with current LR and PS quite well.
Thank you for pointing this out. Indeed, if you install DxO Nik suite on top of existing one, it will wipe it. There is a good reasoning for this – DxO pretty much kept Nik “as is” and only fixed bugs that were present in Photoshop CC – the rest of the functionality is identical. Because the package is exactly the same, it cannot be installed in a new path and must use existing folders / directories for Nik software to function. Having owned Nik Software, you probably remember that each time Nik would release an update, it would do exactly the same thing – override existing installations. So it is not like DxO intentionally made it so that it wipes out your old Nik suite.
It is true that the download for the old free version is not working on DxO’s website at the moment. However, you can browse the web and find plenty of websites that still allow you to download for free. I would love to put it on Photography Life as a download for our readers, but I can’t for legal reasons…
Lastly, DxO is in bankruptcy at the moment, but I believe their software division is a separate company. DxO made a few dumb decisions, including the DxO One camera that never sold, so they got into trouble. Personally, these things don’t matter to me. I bought DxO’s version to support their efforts, hoping they would release bigger updates and got my Nik plugin at an excellent price during the holiday promotions. Before that, I was still perfectly happy with the free version, although I had to change my settings in Photoshop to apply adjustments to existing layer, since new layer functionality was broken.
DxO Labs is bankrupt but still trading, under French Law similar to US Chapter 11 bankruptcy. DxO Mark is not bankrupt. DxO Mark tests cameras and lenses whereas DxO Labs is a software company. I read article recently that DxO Labs was bought out by GoPro and their bankruptcy was as much a result of GoPro’s troubles as their own. However, I can’t find the article or any reference to that so it may or may not be true. DxO Labs claim they will have a new upgraded version of the Nik Collection available in June.
In using the U-points you can hold down the ALT (or maybe CTRL – I forget) key while on a U-point to copy the U-point and drag a new one with the previous settings. NIK does it right because you can easily select just the color – blue for example.
For a sky, I quickly drag 4 or 5 points and adjust the sizes.
A warning though – more u-points slow it down a bit.
Ross, absolutely! One can also click on the existing control point and click the “Duplicate” button to create an identical one. I purposefully used only one control point for this example, because adding more than one can often be problematic to fix the sky, as the transition points and the effects of those control points can make the sky look weirder. For such situations, adding a single control point, fixing the problem, then relaunching Viveza and addressing another issue specifically can yield better results. In the above example, you can see that the first control point was to specifically adjust the brightness and the hue of the center area of the sky, while the second control point had completely different settings in order to make the left side look more even. It would have been impossible to do this with two control points at the same time…
Hope this makes sense.
Yes it does Nasim. Downside of control points. I do like control points for adding tonal contrast locally in color Efex pro. I think everybody did that.
Why would you want to “fix” the sky in first scenario? Darker sky on the left (as well as brighter wall) is normal and gives me perspective where (sun)light comes from. I’d say don’t fix if it ain’t broke.
Agree…
I like the first unedited version better as well. It looks more natural but it is a matter of taste and of course this article is about learning the editing proces.
Franc, that’s because using a polarizer made the left side of the sky darker (I have two versions of the same image – with circular polarizer rotated a bit and without). The sky wasn’t that dark on the actual scene, which is why it needed to be fixed. Second, it is a post-processing tutorial that shows how to fix issues like this :)
In first example with LR, couldn’t you also adjust what is being affected by using the color range feature and selecting the blue sky color? I realize the way you have done it is also easy.
Rick, technically yes, and that’s the approach I would take if I were dealing with a subject that had no overlapping colors. In the above case, the building had quite a bit of blue texture on it and using the range was also touching some of the color there, which is why I figured it was easier to use the erase tool instead and simply brush those areas off.
Here is a cool thing for more advanced Lightroom users – one can use the Graduated Filter to select an area, then use the Range Mask to select a particular color, then use the Brush Erase on top of that to paint off the affected areas. It is often quicker to do this than the method I described in the article, but I didn’t want to make the steps too complex for our readers.