WordPress Multisite lets you run multiple websites from a single WordPress installation. When setting up Multisite, you choose how the addresses (URLs) for your sites are structured:
- Subdomains: Each site gets its own unique address before your main domain name (e.g., site1.yourdomain.com, site2.yourdomain.com).
- Subdirectories: Each site’s unique address comes after your main domain name, like folders (e.g., yourdomain.com/site1, yourdomain.com/site2).
It’s much easier to choose the structure you want when you first set up your Multisite network. But what if you’ve already set it up and want to change it?
Can You Switch Between Subdomains and Subdirectories?
Technically, yes, WordPress allows you to switch an existing Multisite network from subdomains to subdirectories, or vice-versa.
However, it’s important to understand that this involves several technical steps. It’s not a single switch you can flip in your WordPress dashboard (though Pressable simplifies one part). It involves editing a core configuration file (wp-config.php) and updating links across your network.
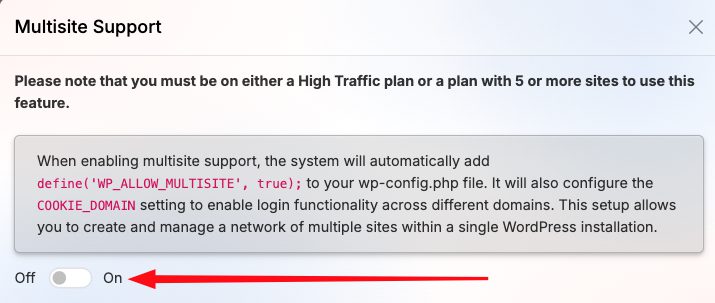
NOTE: Subdomain multisites are only available on Pressble plans of 5 sites and up.
Important Considerations Before Switching
Changing your Multisite structure is a significant undertaking. Please consider these points carefully:
- 🚨 HIGH RISK: Making mistakes during this process can break your entire network of websites, making them inaccessible.
- Backups Are Essential: Before starting, it is strongly recommended that you create a complete backup of both your website files and your database. If anything goes wrong, you’ll need this backup to restore your sites.
- Technical Skill Required: This process involves editing files (
wp-config.php) and potentially using database tools. If you’re not comfortable with these tasks, help from a developer is recommended. - Website Link Updates: Every link within your content, theme settings, and plugin settings might need to be updated to the new URL format. This can be tedious and requires careful checking.
- SEO Impact: Changing your site URLs can affect your search engine rankings if not handled correctly. You’ll need to ensure old links redirect properly to the new ones (using 301 redirects) to tell search engines where the content has moved.
- DNS (Especially for Subdomains): Switching to subdomains requires special DNS setup (Wildcard DNS or individual records, A or CNAME, for each subdomain) before you start, so browsers know where to find site1.yourdomain.com, site2.yourdomain.com, etc.
The Switching Process: Step-by-Step Guide
Warning: These steps involve editing core files and potentially using database tools. Proceed with caution. If you are unsure about any step, please consult a WordPress professional. Multisite conversion falls beyond the scope of Pressable support.
1. Create Full Backups:
- Make a complete backup of your WordPress files and database (you can do this via the Pressable control panel or third-party plugin/service).
- Verify your backups can be restored if needed (you can safely assume this is true if you used Pressable’s backup option).
2. Edit wp-config.php File:
- Connect to your site using SFTP or a file manager plugin.
- Locate the
wp-config.phpfile in the main root directory (/htdocs) of your WordPress installation. - Download a copy of this file as an extra precaution before editing.
- Open the file in a plain text editor or the file manager plugin’s editor.
- To switch TO Subdirectories: Find the line
define('SUBDOMAIN_INSTALL', true);and changetruetofalse. - To switch TO Subdomains: Find the line
define('SUBDOMAIN_INSTALL', false);and changefalsetotrue. - Save the changes and upload the modified
wp-config.phpfile back to your server, overwriting the original.

3. Adjust Pressable Multisite Setting (If Switching TO Subdomains):
- Log in to your site’s Pressable Control Panel.
- Navigate to the Site Overview → Site Tools → Multisite Support section.
- Locate the toggle or setting for Multisite Support.
- If switching TO Subdomains: Ensure this setting is enabled.
- If switching TO Subdirectories: Ensure this setting is disabled.
- Save any changes in the Pressable Control Panel.


4. Update Site URLs in Network Admin:
- In your WordPress Network Admin dashboard, go to Sites -> All Sites.
- For each site in your network (including the main site):

- Hover over the site name and click Edit.
- Go to the Info tab.
- Update the Site Address (URL) field to match the new structure (e.g., change sub.yourdomain.com to yourdomain.com/sub or vice-versa).
- Scroll down and click Save Changes.
- Update URLs in Database (Recommended):
- Old URLs might still exist within your post content, theme options, or plugin settings. Changing them manually is difficult.
- Caution: Directly editing the database is risky. Pressable offers a database search-replace tool in your site’s Pressable control panel. As an alternative, consider using a dedicated plugin.
- Install and activate a plugin like “Better Search Replace”.
- Go to Tools -> Better Search Replace.
- In the “Search for” field, enter your old URL format (e.g., http://sub.yourdomain.com or http://yourdomain.com/sub).
- In the “Replace with” field, enter your new URL format (e.g., http://yourdomain.com/sub or http://sub.yourdomain.com). Ensure you use https (not http) since Pressable automatically forces https.
- Select all database tables (or at least
wp_options,wp_posts,wp_postmeta,wp_blogs,wp_site, and any relevant theme/plugin tables). - Crucially: First, run a “Dry Run” by checking the “Run as dry run?” box. This will show you what would be changed without actually changing anything. Review the results carefully.
- If the dry run looks correct, uncheck the “Run as dry run?” box and run the search/replace for real.

5. Configure DNS (Only if Switching TO Subdomains):
- This step must be done before or immediately after switching if moving to subdomains.
- Log in to your domain registrar (where you bought your domain name) or DNS provider.
- The simplest approach is to add a Wildcard DNS record. This tells browsers that any subdomain (*.yourdomain.com) should point to your Pressable server.
- This is usually an A record with * as the host/name, pointing to your server’s IP address, OR a CNAME record with * as the host/name, pointing to your main Pressable site address (e.g., sites.pressable.com or similar – check Pressable documentation for the correct target).
- Consult your provider’s documentation or support for specific instructions. DNS changes can take time to propagate (update across the internet).
6. Clear All Caches:
- Pressable Caches: Use the cache clearing options within your Pressable Control Panel.
- Page Builder Cache: If your site(s) use a page builder, you will very likely need to flush its cache. This forces it to rebuild static assets (like CSS and JavaScript files) using the new URL.
- Browser Cache: Clear your own web browser’s cache to ensure you’re not seeing old versions of your site.
7. Test Everything Thoroughly:
- Visit the frontend of every site in your network. Click through pages, check navigation menus, and look for broken links or images.
- Try logging into the dashboard of each sub-site.
- Test any forms (contact forms, login forms).
- Check if plugins and themes are functioning correctly on all sites.
- Use an online tool to check if your 301 redirects (if you set them up for SEO) are working correctly.
Why Isn’t It Simpler?
Even with Pressable handling server rules, this process still touches several critical parts of your website setup:
- Core WordPress configuration (
wp-config.php). - The structure of all your website links stored in the database.
- Potentially external services like DNS.
Changing any of these requires precision to avoid breaking things.
Recommendation
Switching an established WordPress Multisite network between subdomain and subdirectory structures is complex and carries risk, even on managed platforms like Pressable.
- We strongly recommend against attempting this unless you have strong technical expertise or are working with an experienced WordPress developer.
- If you are just starting, choose your desired structure carefully during the initial Multisite setup.
- If you must switch, ensure you have complete, working backups before starting, and proceed with extreme caution. Contact Pressable support if you have questions about platform-specific steps like the Multisite toggle, DNS, or SSL.