Every WordPress site uses a database to store content and settings. Each table in that database starts with a prefix, such as wp_, which helps identify which tables belong to your installation. You can view or change this prefix in your site’s wp-config.php file.
Changing the database prefix can be useful in some cases, but it’s also a process that requires care. Done incorrectly, it can cause site errors or data loss. This article explains when it makes sense to change your prefix, when it’s unnecessary, and how to do it safely using phpMyAdmin.
This is usually a high risk, low reward change. Unless you have a specific use-case that calls for a custom prefix you may want to look for alternatives to the problem you are attempting to solve.
Why You Might Want To Change The Database Prefix
- Avoid table conflicts when importing or merging databases from another WordPress site.
- Differentiate tables for multisite networks or custom setups.
- Obscure table names from basic automated scripts that look for
wp_tables.
These are valid reasons, but prefix changes should be approached with caution.
Why It’s Usually Not Necessary
On Pressable, your site is already isolated and protected by our managed infrastructure. Remote connections to your site’s database are blocked. Changing your table prefix offers little additional security, and modern exploits no longer depend on the default prefix.
If the change is done incorrectly, your site can lose access to critical data or experience downtime. Before investing time in this change, consider more effective ways to improve your site’s security.
Better Ways To Improve Site Security
- Jetpack Security
- Two-Factor Authentication
- Regular Security Audits
- Automating WordPress Security
- Advanced WooCommerce Security
Preparation
If you decide to go ahead with setting a custom table prefix, make sure you take necessary steps to protect your data and site stability.
- Create a full manual backup of your site files and database: How to Manually Back Up Your Site.
- Consider testing on a staging site first: How to Clone a Website to Staging.
How To Change The Database Prefix
Step 1: Locate And Edit The Prefix In wp-config.php
You can access your files using SFTP, SSH, or a file manager plugin:
Open wp-config.php and find this line:
$table_prefix = 'wp_';
Change 'wp_' to your desired prefix. For example:
$table_prefix = 'xyz_';
Save your changes but do not reload the site yet. The database tables must be renamed next.
Step 2: Rename Tables In The Database Using phpMyAdmin
- Log in to phpMyAdmin: See our Access phpMyAdmin guide.
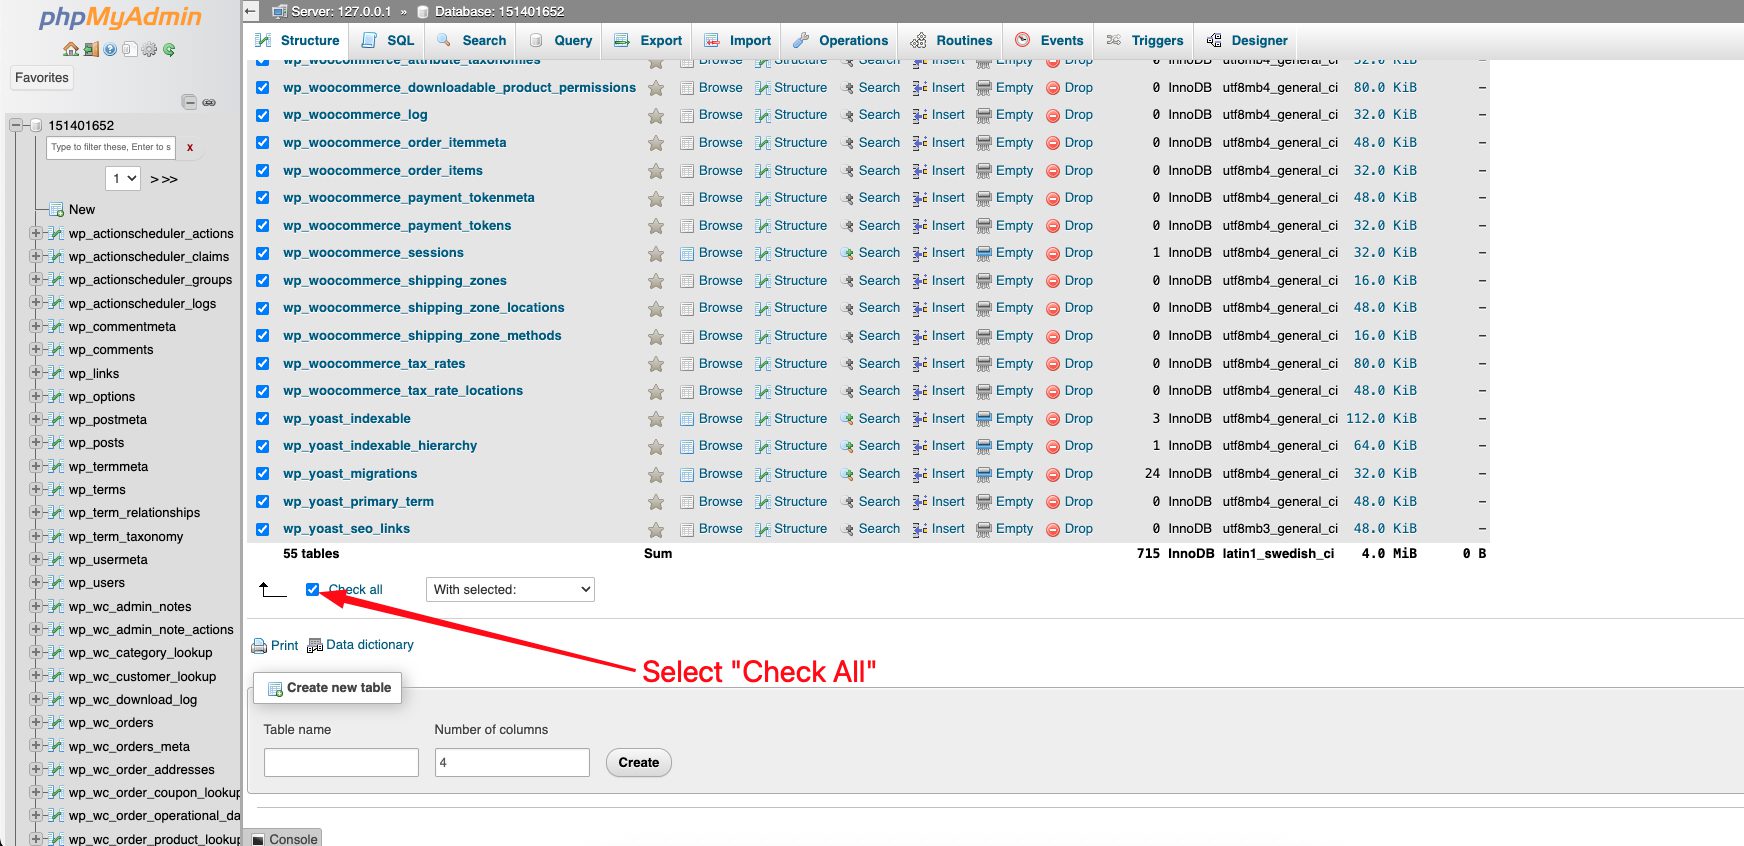
- Select your site’s database by clicking the number shown at the top of the left-hand column in phpMyAdmin (this opens the list of tables for that database).
- Scroll to the bottom of the table list and click Check all.
- Open the With selected: dropdown and choose Replace table prefix.
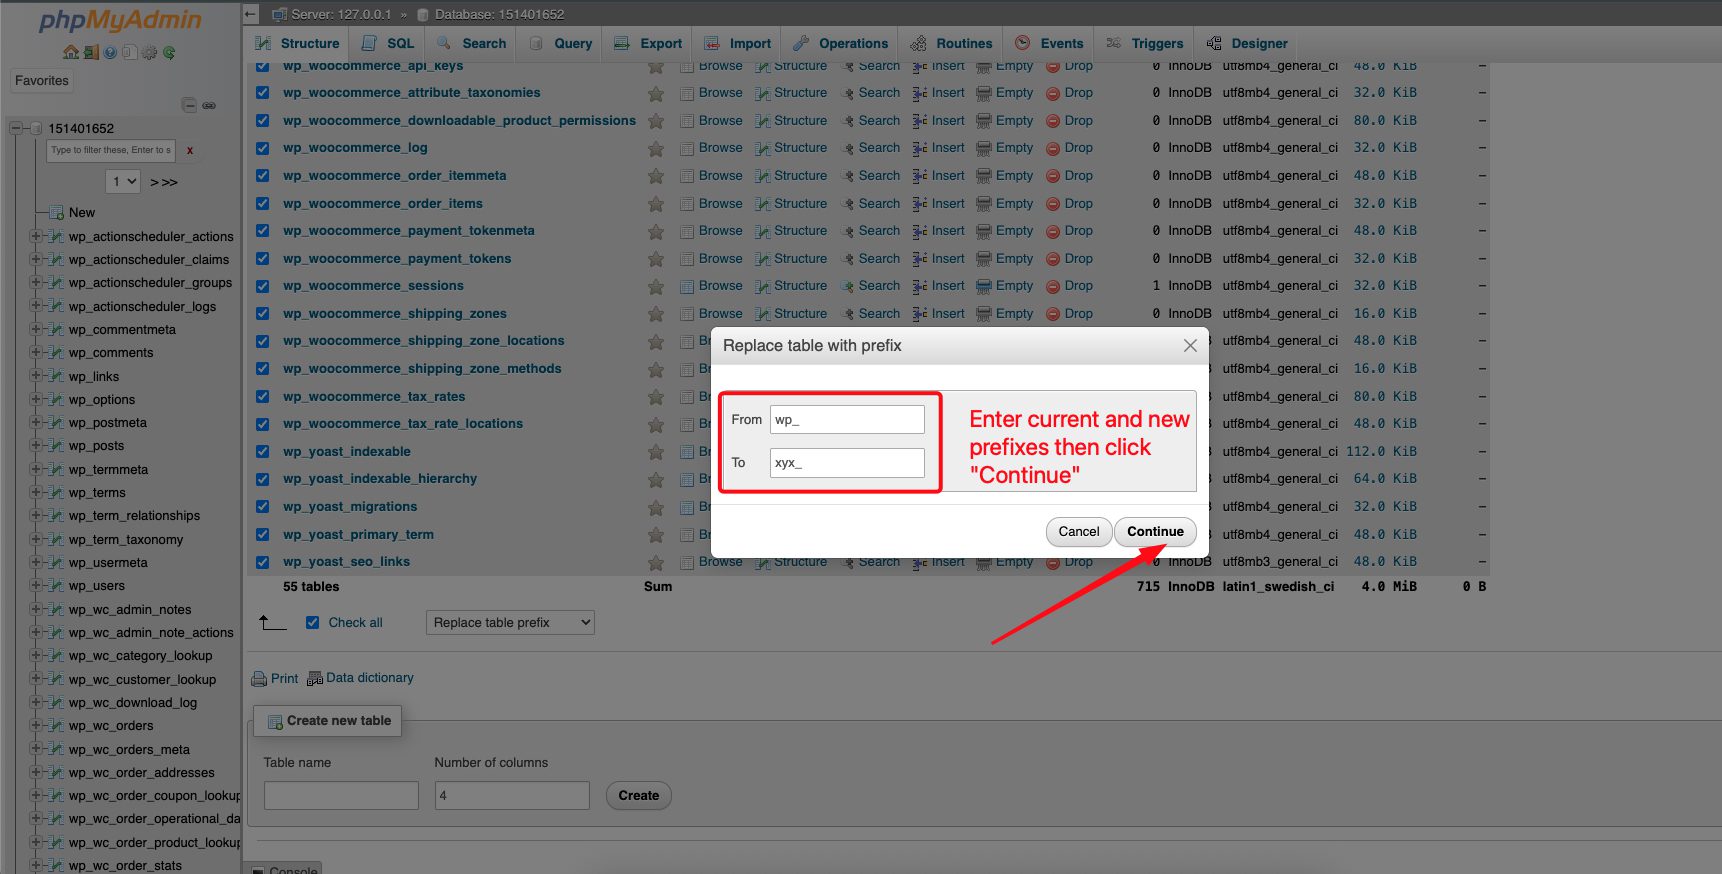
- In the modal window, enter your current prefix (for example,
wp_) as the From value and your new prefix (for example,xyz_) as the To value. - Click Go to apply the change. phpMyAdmin will automatically rename all selected tables.
- After the rename completes, you still need to update prefix references stored inside certain tables. Run these SQL statements in the SQL tab.


Before running these SQL statements, verify your backup is current and accessible. If something goes wrong, restore from your backup rather than attempting manual corrections.
Step 3: Update Stored Prefix References
You have two methods for updating stored prefix references. Both work correctly; choose based on your preference and situation.
Method 1: REPLACE function (most flexible, widely used)
This approach replaces all instances of the old prefix anywhere in the value. WordPress core meta keys only use the prefix at the beginning, so this works correctly for standard installations. However, if a plugin created a meta key like my_wp_custom_key, it would become my_xyz_custom_key.
UPDATE xyz_options
SET option_name = REPLACE(option_name, 'wp_', 'xyz_')
WHERE option_name LIKE 'wp_%';

UPDATE xyz_usermeta
SET meta_key = REPLACE(meta_key, 'wp_', 'xyz_')
WHERE meta_key LIKE 'wp_%';
Method 2: SUBSTRING/CONCAT (more precise, assumes exact prefix length)
This approach only replaces the first characters of the value (the prefix itself). It’s more precise but assumes your old prefix is exactly 3 characters (wp_). Use this if you need to ensure only the beginning of the string is modified.
UPDATE xyz_options
SET option_name = CONCAT('xyz_', SUBSTRING(option_name, 4))
WHERE option_name LIKE 'wp_%';

UPDATE xyz_usermeta
SET meta_key = CONCAT('xyz_', SUBSTRING(meta_key, 4))
WHERE meta_key LIKE 'wp_%';
Which approach should you use?
- Use Approach 1 for most situations (this is the standard method in WordPress documentation)
- Use Approach 2 if you need absolute certainty that only the prefix is changed, or if you’re concerned about plugins that might have embedded the old prefix within meta key names
Important notes:
- Run each statement separately and verify the results before proceeding to the next
- The order between
wp_optionsandwp_usermetadoesn’t matter; both can be run in either sequence - Both tables must be updated before testing your site
Optional: check and update postmeta if needed
Most sites won’t need this step unless you use plugins that store custom meta keys with the table prefix. This is uncommon, but worth checking. Run the preview query first to see if any rows exist:
-- Preview count (safe):
SELECT COUNT(*) AS rows_to_update
FROM xyz_postmeta
WHERE meta_key LIKE 'wp_%';

-- If rows_to_update > 0, run the update (choose one approach):

-- Approach 1: REPLACE function
UPDATE xyz_postmeta
SET meta_key = REPLACE(meta_key, 'wp_', 'xyz_')
WHERE meta_key LIKE 'wp_%';

-- Approach 2: SUBSTRING/CONCAT
UPDATE xyz_postmeta
SET meta_key = CONCAT('xyz_', SUBSTRING(meta_key, 4))
WHERE meta_key LIKE 'wp_%';
Multisite considerations
If your WordPress installation is a multisite network, you’ll have additional tables and references to update. Consider engaging an experienced WordPress database developer to review multisite network updates.
- Network-level tables (rename these along with the core tables in phpMyAdmin):
wp_blogswp_sitewp_sitemetawp_signups(if user registration is enabled)wp_registration_log(if present)wp_blog_versions
- Numbered site tables: Each additional site in your network has its own set of tables with numbered prefixes. For example, site ID 2 would have:
wp_2_optionswp_2_postmetawp_2_posts- And so on…
- Update options and usermeta for each site: After renaming tables, you must run the UPDATE queries for EACH numbered site’s options table. For example:
-- For site ID 2: UPDATE xyz_2_options SET option_name = REPLACE(option_name, 'wp_', 'xyz_') WHERE option_name LIKE 'wp_%'; -- For site ID 3: UPDATE xyz_3_options SET option_name = REPLACE(option_name, 'wp_', 'xyz_') WHERE option_name LIKE 'wp_%'; -- Repeat for all additional sites... - Shared tables: The
wp_usersandwp_usermetatables are shared across all sites in the network, so you only need to update these once (as shown in the regular instructions above).
Which Keys Are Affected
wp_options: includes keys likewp_user_roles, which define user capabilities.wp_usermeta: includeswp_capabilities,wp_user_level, and other user-related meta keys.wp_postmeta: rarely affected, but some plugins prefix custom meta keys.
Once done, verify that all tables use the new prefix and the site loads correctly.
Notes
- The Replace table prefix action only changes table names. The two SQL statements above are required to update stored references.
- If your database contains other applications, select only the WordPress-related tables before running the replacement.
Step 4: Verify And Test
- Flush all caches: Clear your object cache and any page caching to ensure you’re seeing fresh data:
- Flush the object cache
- Flushing the edge cache isn’t strictly necessary but you may wish to do so as well
- Visit your site and confirm it loads correctly.
- Test admin login: Log in to the WordPress dashboard with your admin account to confirm authentication works.
- Verify user roles and capabilities: Check that your user account still has the correct permissions and can access all expected areas of the dashboard.
- Check for missing data: Browse through posts, pages, media, and other content to ensure nothing is missing or broken.
- Test custom functionality: If you have any custom code, plugins, or themes that query the database directly, test those features to ensure they still work.
- If you tested on staging, clone back to production when satisfied.
How To Get The Current Database Prefix Programmatically
Developers can retrieve the current prefix using the $wpdb class:
global $wpdb;
echo $wpdb->prefix;
This is useful when writing custom queries or plugin logic that needs to reference specific database tables.
Summary
Changing the database prefix is mostly cosmetic and rarely adds meaningful security. It’s useful for organizational or compatibility reasons, but always back up your data first and test in staging before applying changes to a live site.
For related information, see: