In this guide, we’ll cover multiple options for pushing — also known as syncing, migrating, or copying — changes from a Pressable-hosted staging site to a live production site already in place.
On an account with a Custom Staging Domain, when a staging site is converted to a live site, the custom staging domain will be removed. When a live site is converted to a staging site the custom staging domain will be added.
Note that Pressable’s free Data Transfer feature is the recommended solution for pushing changes from a Pressable-hosted staging site to an existing site.
We do not recommend syncing or pushing data from a staging site to live production news sites or sites that use ecommerce plugins, such as WooCommerce, without proper planning and testing.
Keep in mind that data on the destination site could have newer transactions, such as customers and orders, and would be lost when overwritten by the staging site’s data.
Preparing to Push Changes
Stop Changes on the Live Site
Before pushing a staging site live, we recommend that you coordinate with all other users that may have editing capabilities to ensure they stop making changes and updates to both versions of the site — especially the live site.
How to Prevent Jetpack License and Connection Issues
To prevent Jetpack license and connection issues, we recommend the following before syncing, pushing, or copying sites.
When possible, use the staging environment variable on your staging site, set the production environment variable on your live site, and follow Jetpack’s Staging Sites and Safe Mode guides.
Otherwise, take the following steps”
- Disconnect Jetpack and deactivate any active Jetpack plugins on both the source and destination sites.
- After disconnecting and deactivating Jetpack, begin pushing/syncing changes.
- After changes have been synced, use the Set Jetpack License button on the updated live site.
- Proceed with activating and reconnecting Jetpack.
If you are missing your Jetpack plan after reconnecting, please contact Pressable support.
For missing Jetpack stats, it can take a bit of time for the information to repopulate after reconnecting. If the stats have not returned after 24 hours, Jetpack’s support can assist and more information can be found on their support site.
Data Transfer: How to Push Changes via Data Sync
Pressable’s free Data Transfer feature can be used to push content, database, and filesystem changes from one Pressable site to another and is the recommended solution for pushing changes from a Pressable-hosted staging site to an existing site. This automated process uses on-demand backups and cross-site restores to create a new backup of a source site and then restore that data to another site.
For the protection of your sites, Pressable will perform an on-demand backup of both the source and destination sites in the event they need to be restored. If no on-demand backup slots are available, instructions will be provided on how to delete an older on-demand backup. For more on managing on-demand backups, please review our detailed backup documentation.
Because there is some donwtime involved in the backup and cross-site restore process we recommend initiating a Data Transfer at your site’s lowest traffic time of day.
Using Data Transfer
Use Data Transfer with caution. The process will completely overwrite the filesystem and/or database on the destination site.
Follow the steps below to start a new Data Transfer, pushing changes from the selected site to a destination site.
- Locate the site you want to push or sync changes from within your MyPressable Control Panel Sites List and navigate to “Environments” section on the Site Overview
- Select “Transfer Data” from the settings menu (icon)
- Select the destination site
- Choose either a full site copy or a more granular transfer, for the latter use the checkboxes to select the data you’d like to sync.
- The site will be checked and you will see a green Ready to sync data message.
- Select whether to Skip HTTP Status Check, as this will skip the HTTP Status Health Check of the destination site (off by default).
- Select whether to skip Maintenance Mode on the destination site
- Select whether to preserve Jetpack license settings on both sites
- Choose the WordPress Environment for the synced site (choosing Default will keep the destination site’s current value).
- Click Start Transfer & Overwrite to begin the Data Transfer process.
Since new backups for both the source and destination sites must be created, this process can take time. An email notification will be sent to your Pressable.com account email address once the Data Transfer process has been completed.
IMPORTANT: Once the Data Transfer process is completed, you’ll want to review your wp-config.php file and database to ensure the WordPress Environment Type and site URLs are specified correctly and, if using Yoast, reset Yoast indexables. If a robots.txt file is being used on the source site, the original robots.txt file from the source site will be kept (this would need to be manually reviewed and changed if syncing from a live to staging or staging to live site). If our default robots.txt file is in place on the source site, it will be automatically changed if the destination site’s WP Environment is changed.
In order for a Collaborator user to have access to the Data Transfer functionality, they must have the Restore Site permission for both the source and destination sites.
Domain Swapping: How to Move Content via a Domain Swap
In addition to the recommended Data Transfer feature, another method to make a Pressable-hosted staging site the live production version is to move your custom domain from the old live version of the site to the new staging version. This will make the staging version of the site use your custom domain, effectively making it the live site.
This involves removing the domain from the live site and then adding it to the new site.
Domain Swap Step One: Delete the Custom Domain From the Live Site.
- Locate the current live site within your MyPressable Control Panel Sites List navigate to the Site Settings page and then the Domains menu.
- Click on the Trash/Garbage can icon next to the domain, under the “Actions” dropdown, to remove the domain. Be sure to remove both the www version and the non-www, or root, domain.

Please wait 60 seconds after removing the domain from the original site and before adding it to the new site. This will help ensure the domain gets added properly and help avoid Domain Not Found issues.
Domain Swap Step Two: Add the Custom Domain to the Staging Site
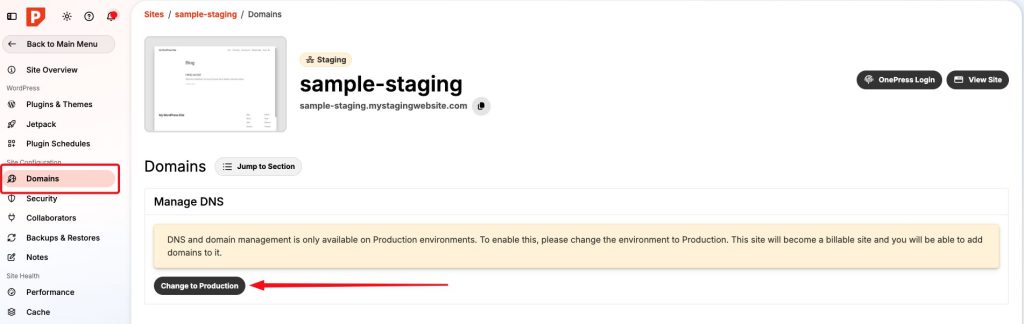
- Locate the staging site within your MyPressable Control Panel Sites List and navigate to Site Settings Page and then to the Domains menu.
- If prompted, click Change to Production. Note that this site will now count against your plan’s live site total.
- Under Add Domains, add your custom domain and click Add.

If the domain is still using Pressable’s DNS records, the swap should be completed immediately. It might take a few minutes to be reflected in your browser.
After adding the domain to your site, it may show that it’s stuck in the Provisioning state instead of Healthy. To fix this, you’ll want to add the Atomic TXT records to your DNS Zone. You may also need to remove and re-add the domain to the site after the Atomic TXT records are resolving.
Plugins: How to Push Staging Sites via Plugins
While we recommend using Pressable’s Data Transfer feature, it is also possible to use plugins to push or copy content, filesystem, and database changes from one Pressable-hosted site to another.
Some popular plugin options include the following:
Syncing Specific Database Tables between Pressable Sites
Currently, it is not possible to sync specific database tables between Pressable sites. This is a feature we’re looking into, but no timeline currently set for implementation.